Welcome

Hello knitters and coffee addicts and welcome. Even if you're not a knitter or like the taste of coffee - welcome anyway - to the site that promotes the learning and appreciation of knitcraft and coffee. The hope is that you'll leave here keen to knit, charmed to coffee and hankerin to return.

Monday, December 28, 2009

Scarf for Cynthia

Okay, I haven't written about knitting for a while; correction, I haven't posted anything for a while. I had planned intended dreamed of knitting items for everyone this Christmas. Well, Christmas came and went, and my needles were untouched like this blog of mine.

So to get a head start on Christmas 2010, I've decided to make a scarf that Cynthia requested, last year (it's going to be a two year project). What do you think of this one Cynthia? It is a Tubular Scarf , a pattern I found on Revelry.com from Anna Hromova. It's one of the many free patterns on Revelry.com. Just become a member (for free!) and you can search for patterns.

Sunday, November 22, 2009

A Sad Day - I Broke My Chemex!


It is a sad day indeed. This was what my Chemex looked like at it's best, brewing me clean crisp coffee. I didn't take a picture of the broken Chemex, it would have been too sad of a picture.

How did I break it? I actually smashed it with a coffee mug. I was pulling a mug out from the upper cupboard and was setting it down on the counter. But before I hit the counter, the mug hit the rim of the Chemex, shattering the upper funnel. well, no use crying over spilled coffee or milk or shattered Chemexes - I will be getting a new one, may be the old school model with the wooden handle this time, the one Sandy originally wanted.

Tuesday, May 5, 2009

Look at All the Beanies!

Pretty good book for an impulsive buy at a grocery store.  Usually when I get a knitting book, I flip through the pages and end up making one or two patterns.  But with this book by Amanda Keeys, I ended up making 5 projects and I plan on making quite a few more.  Not sure what I'm going to do with all of these beanies because Sandy's not expecting and Khuno sure doesn't like wearing them.

Saturday, May 2, 2009

Looked Good in the Picture


A friend of mine is very pregnant and so I figure should get started in knitting up some baby hats for the little one.  Since we don't yet know the gender, I'm knitting one for each.  I'm betting on a girl though.  I chose this one cuz it looked really good in the picture; cute baby modeling the hat helped.  The pattern is from the book, Baby Beanies by Amanda Keeys.  My review of the book can be found in a earlier post on this blog.

Well, after 5 trys, I ended up with this.  Not quite the same as the picture - I read the decreasing steps wrong, really really wrong.  The sixth try was a gooder.


To make one yourself, this is what 
you do:

1. Cast on a heck of a lot of stitches, 192 for a small (0-6 months, 12 3/4" circumference), 216 for a medium (6-12 months, 14 1/2" circumference), 240 for a large (1-2 years, 16" circumerence) and 264 for an extra large (> 2 years, 17 1/2" circumfernce).  Use size 7 needles.  I started on circular needles then switched to double pointed needles.

2. For the first round after casting on, place a marker of some sort, connect the round and knit for the entire round.  The author suggests to knit your stitches really loosely on this round and I would have to agree.  Make your stitches really really loose cuz you have to knit three together in the next round.

3. Second round - (k3tog) Knit three stitches together and repeat until you reach the end of the round.  You should end up with 64 (72, 80, 88) stitches at the end of this round.  As an alteration to the pattern, I'd start with only half the cast on stitches and then knit 2 together for the second round.  You'd end up with less ruffle (prolly shoulda told you this in the beginning but it's a quick knit, you can make one of each).

4. Forth round and onwards, working in the round, knit all stitches until you are about 1/2" from the cast on edge.

5. Eyelet round - kinda tricky cuz of the yarn over.  For this round do this stitch pattern: yarn over (YO), knit 2 together (k2tog) and knit 6 (K6).  Repeat this until the end of round.  To do a yarn over just do a regular knit but instead of having the yarn that leads to the ball in the back, have it in the front of the piece and then loop it around the needle and knit.

6. Boring part - knit like crazy on every round until the piece measures 5 1/2" (6", 6 1/2", 7") from the cast on edge.

7.  Decreading part - the part that I messed up.  For the first decreasing round, knit 6 then knit 2 together and repeat this (k6, k2tog) until the end of the round then stop.

8. Now knit the whole round and stop.

9. Now knit 5 then knit 2 together and repeat this (k5, k2tog) until the end of the round.

10. Knit entire round.

11. Knit 4 then knit 2 together and repeat (k4, k2tog) until the end of the round.

12. Knit entire round (do you see a pattern developing here?)

13. Knit 3 then knit 2 together and repeat (k3, k2tog) until the end of the round.

14. Knit entire round.

15. Knit 2 then knit 2 together and repeat (k2, k2tog) until the end of the round.

16. Knit entire round.

17. Knit 1 then knit 2 together and repeat (k1, k2tog) until the end of the round.

18. Knit 2 together and repeat (k2tog) for the whole round.

19. Cut yarn leaving a long tail (6") to be safe and thread the tail through the remaining loops.  Let the tail end up falling into the center of the hat on the inside of the hat.  Now pull the tail, closing the opening like a drawstring.  Tie the tail and weave in the end.

20. Weave a nice ribon through the eyelets and tie in a bow or a knot (if your not good with bows) but leave some slack for the hat to expand.

Monday, March 2, 2009

Fetching on Knitty - Clarity on Thumb, I Hope

Alice was having problems with my instructions for making the opening for the thumb and emailed me for some help (by the way, it's so cool that people other than Sandy and my sister are reading this blog).  So I quickly whipped up this video.  It was a quick knit - I went straight into the thumb opening after only one cable and a few rounds of the 4k1p pattern; on the real one, the piece would be bigger than the one I have on the video.


After seeing the video, I'm pretty sure that I'll have to make another one since some of the shots were out of frame - the camera was lower than I had thought.  


Sunday, March 1, 2009

Pretty in Punk Review

To tell you the truth, the cover was the reason why I bought this knitting book.  The mohawk hat looked like a challenge especially with the intarsia union jack.  The hat pattern is the signature pattern from the two author's online knitting store, knit-head.com.  The book, Pretty in Punk, is what I see is progressing in knitting - the move to fun, patterns that appeals to younger knitters or young at heart knitters (I'm one of the latter).  No longer is knitting about dull scarfs and sweaters. 

The two authors, Alyce Benevides and Jaqueline Milles, probably started  knitting like all of us with a simple stockinette scarf pattern.  But their creativity and resourcefullness lead them to create pieces that they wanted to wear, and in this case it was punk and a bit of goth.

Initially, I had thought that I would tackle the mohawk hat for my first attempt at intarisa, but after skimming the pattern and realizing I had no idea what intarsia entailed, I decided on the wrist band.
Not bad for my first attempt at knitting with colour.  The book is a good one with lots of interesting patterns.  The only thing is that it was lacking in instructions and pictures on how to do some of the skills.  I had to use the good-ol internet to learn how to intarsia.  This is deffinately not a beginner book.  I would say intermediate or for the beginner that wants a challenge (again, I am the latter).

It's Roll-Up-The-Rim Time!


Roll Up the Rim season is here!  It seems that it came a little earlier than usual, but I'm not complaining.  It started last Saturday when I spotted a woman crossing the street carrying the distinctive red and yellow rollup cup from Tim Horton's.  I stopped my car, rolled down my window and asked her if it was indeed a rollup cup.  she confirmed it and added that she wouldn't of gotten an extra large coffee otherwise.  Sandy was in the car with me and instead of sharing in the joy of the rollup season, she just looked over at me and said, "you're such a loser."  But no, she is wrong, I am a winner, we all are winners because it's Roll-Up-The-Rim Season!

Wednesday, February 11, 2009

Center Pull Ball - Power Version!

Yup, it was inevitable that power tools would make it's way into knitting (especially when I knit).  This is my way of making a center pull ball of yarn - it's the manly way.  You can do it the old fashion way, by hand, or you can buy one of those mechanical yarn winders.  But if you have a drinking straw and a power drill, you can wind yarn faster and have fun doing it.


This is what you'll need:

1. power drill - doesn't have to be an impact driver like the one I have; any power drill will do - 
variable speed would be a plus.

2. drinking straw - I used one of the straws you get when you buy bubble tea cuz it's big.

3. something to connect the straw to the drill - I used a connector piece that came with my drill that lets it connect to 
different screwdriver heads (and a bubble tea straw, as you can see here).

so basically I took the connector piece, wrapped some electrical tape around it so that it would make a tight fit in the straw.  Then I poked a hole in the straw using a knitting needle (in hindsight I should have poked the hole a little bit closer to one end of the straw).  Feed the yarn through the hole and down one end of the straw - if you poked the hole closer to one end, this part will be easy since you can probably thread the yarn through.  I needed to use a 
needle.  With the yarn sticking out the one end, connect the straw to the connector piece and attach the whole thing to your drill.  Now the fun part!  Let'R rip!  You might want to go slowly at first though.  Try not to pull too tightly on the yarn as you're winding it - this will make it easier to pull it off the straw when you're done.


And there you go, a center pull ball of yarn - looks kinda like a football.


Center Pull Ball of Yarn

I found this cool site - KnittingHelp.com.  So obvious, why didn't I think of typing this into google earlier?  It's a great site because it has videos!  I've tried to make some videos of me knitting, but I keep making knitting mistakes whenever I'm taping.  Anyway, KnittingHelp.com has videos of basic knitting techniques as well as more advanced techniques like initersia - something I gotta try one day.

The most useful skill, I think, is to create a center pull ball of yarn.  Sure the yarn you get from 
the store is already center pulled but it's a pretty big and loose ball.  Somehow, I usually manage to create a tangled mess when I try to knit directly from an untouched, straight from the store, ball of yarn.  Rewinding the yarn into a small, snuggly wound ball help minimize tangles.  A bonus in all of this is that you can buy more yarn since the yarn balls are so much smaller!

Sunday, February 1, 2009

Bamboo Splinters

My needles are here! Friday was a good day; for one thing, it was Friday - Fridays are always good, but it was extra good because the knitting needles I had ordered arrived! And to top it off, we went out for all-you-can-eat sushi!

The needles are all bamboo from eKnittingNeedles.com and they are sweet. I kind of went overboard when I saw the prices - an entire set of needles for $30. After buying a few pairs from Michaels from $8-$18 a pair, 30 dollars for a whole set of 30 needles was a steal. Now my math is pretty bad without a calculator, but I think that works out to a dollar a set - Score! I ordered three sets, a set of single points (14"), a set of double points (8"), and a set of circulars.


What You Get
For the single point set, you get 30 pairs in the set. The double point set is a 75 piece set, with 5 needles per size - so that's 15 sets of dpns. And for the circulars you get 15 of then. So for the dpns and the circulars, they work out to 2 dollars each - still a whole lot cheaper than getting them at that at your local Michaels, even after factoring in the $CDN/$US exchange rate and shipping.
Comparing the eKnittingNeedles.com needles to Clover/Takumi needles, they seem comparable for the single and double point needles. Honestly, I cannot see a difference in quality. Both feel equally smooth and equally stiff. On the single point needles, Clover uses an oblong knob whereas the eKnittingNeedles use a rounded knob as you can see in the picture. But after checking other Clover needles in my collection, Clover also uses the rounded knobs. Both Clover and eKnittingNeedles brand/stamp the needle size onto the side of the needles. The double point needles from the two companies would be identical if it wasn't for the different stamps used to indicate the size.

The circular needles a little are different. Clover circulars are nice. They use what looks like a solid clear plastic cable to connect the needles. The connection between the bamboo needles and the plastic cable is clean and slick. You can see a small piece of bamboo coloured plastic making the transition from the bamboo needle to the clear plastic cable. The connection feels solid too.

The circular eKnittingNeedles are different. Instead of a clear solid plastic cable, eKnittingNeedles uses coloured plastic tubing which seems to be just glued to the tapered back end of the bamboo needle. Feeling the connection, I can feel a little roughness from the excess glue. The connection feels solid though. I'm not sure if the use of tubing instead of solid plastic makes a difference when it comes to knitting. The tubing is easier to bend than the solid plastic and the tubing size increases with the size of the needle. I'm pretty sure that there were only a few sizes for tubing, but eKnittingNeedles seem to have used the small tubing for the small needles, medium sized tubing for the medium needles and so on. This might be a good thing since it keeps the loops in your knitting close to the size of the needle even when they are on the tubing. Other than the tubing and the bamboo needle feels the same as the Clovers.

Shipping
The needles arrived in a simple bubble wrap lined envelope which worried me at first, but, I guess with such a large order, all the needles formed a pretty strong mass of bamboo. None of the needles cracked or snapped - even the really thin needles (2mm/US size zero). I have no idea when I will ever use the 2mm needles; they are really thin - I'm talking toothpick thin. eKnittingNeedles charges a flat $4 shipping fee for all Canadian orders over $15. They shipped by USPostal so it took a little longer (approx.2 wks) than a courier. Not sure if there is an agreement between the US and Canada on the free trade of knitting needles but Canada Customs did not slap me with duty or GST.

Waxing Your Bamboo
After searching on amazon.com, I found a bunch sellers, offering similar bamboo needles. On one of the sets, a reviewer mentioned needing to wax them with carnuba wax before using. Makes sense, I thought, since carnuba wax makes your car look shiny and polished, it should make the needles just as shiny and polished. Carnuba wax is also pretty safe since it is used in the candy industry for, what else, making candy look shiny and polished - just look at the ingredients on a package of gummies or Twizzlers. So I went to the local tire chain in Canada and got a tin of wax, a big tin of wax; it seems that wax does not come in a smaller size. Well, I can always wax my car afterwards, and possibly Sandy's car and the neighbor's cars.

After waxing a set of needles, I'm not sure if it made that much of a difference (bottom two needles were waxed - can you tell?). The waxed ones look almost the same as the unwaxed ones. They do feel a little different however. The waxed ones feel waxy - well duh, Jamie, you just waxed them. What I mean is, they do not feel as slick as the unwaxed needles. The wax seems to add a bit more friction - which might be a good thing for keeping the yarn from slipping off the needles. The waxed needles also feel smoother than the unwaxed needles. But this extra smoothness is very very slight. The unwaxed needles are already pretty smooth. So you can wax your needles if you need the extra friction coefficient, but otherwise waxing is not needed. I'm still going to wax mine though because I have a big tin of wax to use up.

Conclusion
Bamboo knitting needles from eKittingNeedles.com are a good buy. They are affordable; you get alot of them for 30 bux; shipping is easy and without hassle; and to me they seem to be pretty good needles. The single and double point needles are pretty much the same as the Clover/Takumi needles. The circular needles use appropriately gauged tubing to connect the needles instead of the solid plastic cable used by Clover. Although the connection between the tubing and the bamboo needle is not as clean as the Clovers, it feels just as solid. For the price, I think these needles are great - besides, as one reviewer on amazon.com stated, you spend your money on good yarn, not on the needles.

Saturday, January 24, 2009

Sweet Sweet Coffee


Ah, the Chemex brewer - it's a classic.  Designed by Peter J. Schlumbohm back in the 40's, becoming popular in the 70's thanks to it's elegantly simple and pure functional design, the Chemex brewer is back and it's on my kitchen table brewing coffee (wow, that was a really long sentence). 

Yes, the Chemex brewer is back and it's sporting a brand new look.  It's not really that band new of a look.  The Chemex company updated the brewer by replacing the wooden collar and leather strap around the middle with a glass handle.  But other than that, the brewer looks exactly the same as the original.  It still has that glass navel signifying the middle of the brewer from the bottom of the handle down (volumnmetrically speaking).

Just looking at the brewer you can see it's chem lab roots.  Dr. Schlumbohn combined the powers of a glass funnel and an Erlenmeyer flask.  He was probably working late in the lab one night and instead of going to the corner cafe for a double double, the good doctor slapped a funnel on a flask, used some chem lab filter paper and brewed himself a cup of the heavenly black stuff (holy, another really long sentence).  Then he yelled eureka and the rest is history.  The brewer is so significant to American design history that it made it to the permanent collection at the Museum of Modern Art in New York city - probably stored next the the Eames chair.

So to brew coffee in one of these things:

1. You first have to boil some water.

2. Fold the filter paper - get the filters when you by your Chemex brewer.


The filters are just big round filter sheets or big square filter sheets.  Just fold it into quarters.  Better yet, get your filter paper pre-folded.  I got the square papers because the extra paper at the corners makes it really easy to pull out the used filter and grinds to throw away.

3. Put folded filter in brewer.

4. Put coffee grounds in filter - use a regular grind, the kind used for drip coffee.

5. Let boiled water stand for 20-30 seconds.

You don't want boiling water to hit your coffee grounds; the water should be just a bit below boiling.

6. Pour a little bit of the hot water slowly onto the grounds and watch the ground bloom.

Basically, you want the water to wet all the grounds so that they'll swell and fill all the air gaps in between the coffee grounds.  This is to slow the hot water's movement through the grounds so that it can absorb more of the coffee goodness.

7. Now you can pour more water into the funnel opening of the Chemex brewer.

8. VERY IMPORTANT - Drink and enjoy your brewed coffee.

Drink your coffee soon after you've made a pot.  It cools fast; I blame the flat bottom.  To help it stay warm longer, I usually leave the used filter and grounds on the brewer after I've finished brewing.  I just lift the filter paper by the corners to pour myself a cup.  I don't know if it helps but in my mind, the filter and grounds act as a plug keeping in the heat.

9. Throw away filter and grounds and clean brewer.  Soap and water is fine.  The hard part is drying it.  I'd use one of those flask drying stands that you see at kitchen or wine shops or lay out a kitchen towel and place the Chemex on that upside down.

The coffee is similar to drip coffee but cleaner.  The Chemex filter paper is a thicker filters than the ones used in drip coffee so most if not all of the coffee grounds are filtered out of the coffee.  The paper also aborbs most of the oils.  I don't see the oily film on top of the cup like I would with coffee brewed using the french press.  This might be a bad thing for some because the flavors and the richness of coffee are in the oils.  But I see this as just a different way to enjoy coffee.  To me, the coffee is clean and crisp.

If you want a Chemex, you can get one directly from Chemex.  If you are from Canada, call the company and ask if they can send it by United Postal and not UPS in order to avoid the brokerage charges.  The nice lady on the phone at Chemex did that for me.  Sweet Maria's also sell the Chemex brewer but they don't ship brewers to Canada for some reason.  I find this odd because they're able to ship espresso makers and grinders to Canada.  If you're really lucky, you might be able to find one of the classic brewers in a thrift store.  My sister has one of these.  I never really like the wooden collar but Sandy thinks it's what makes the brewer cool.  I like the glass handle.

Friday, January 23, 2009

1st Coffee Post - How I got into coffee


Well, seeing how this blog is called Knit, Purl and Brew I figure I should try to stay true to the title and have a few posts on coffee.  Yes, the Brew refers to brewing coffee.  Although, I had thought about opening it up to include tea and maybe even beer.  Let's just say that I'm not totally closing the door on beer - I'll probably throw a post or two about it.  Maybe I'll try knitting drunk one day.

Anyhoo, back to coffee.  Yup, I'm into coffee... alot of coffee.  I drink quite a bit of coffee at work everyday - most of it not very good coffee.  But on the weekends, that's when I break out the good stuff.  Nothing beats a freshly ground and brewed cup-o-joe on a cold Edmonton Sunday morning.

I got into coffee thanks to my mom.  I don't remember where we were, but I was quite young, maybe 7 or 8, it was cold and my mom gave me a sip of her coffee to warm me up.  Back then she had cream and sugar with her coffee.  When I tasted that warm sweet creamy liquid I was hooked.

Even though enjoyed the taste of coffee, I actually didn't drink much coffee after that first experience, but when I grew up, I re-established my addition.  Throughout university, coffee kept me awake and focused when studying.  Then I discovered coffeegeek - a website dedicated to coffee and espresso.  Soon, I learned that there was quite the coffee community online.  Even though I was in cold blue collar Edmonton, I could get all the coffee information I needed.  The only thing left was to taste great espresso.

With coffeegeeks reviews and forums, I decided to get Silvia, a tough little starter espresso machine that was very finicky with her temperature consistency.  But from the interweb I discovered that she could be modded.  Sites like Murphy's  and Pepe's (I can't seem to find his site), detail how a PID can be implanted into Silvia to make her great.Then on one fateful day in September she was mine.  Sandy and I had been dating for about a year and she surprised me with Silvia for my birthday gift.  

Of course any coffeegeek would know that you need a good grinder to get good espresso.  I had wanted to get the Mazzer Mini, the ultimate in home coffee grinders at the time.  But also at the time, I was short on free money so I looked around the netterweb and found Sweet Maria's.  
They carried hand grinders from Zassenhaus which had conical burrs - which is the latest thing in grinders now(conical burrs, not hand grinders, back then the flat burrs were the norm).  Plus, I figured, since the coffee was hand ground, physically, I would not be able to heat up the grounds through grinding - this was a good thing.  So ordered one from Sweet Maria's.

With the grinder on it's way, I needed some beans, freshly roasted beans.  These I found locally.  Even though, at the time, Edmonton only had one or two espresso cafes it had a roaster - Edmonton Tea and Coffee and they carried 100% Kona and Jamaican Blue Mountain beans as well as other coffees and blends.  But being me, with the mentality of going big or go home, I got a pound of kona beans.  Not really the best purchase for the newb barista on a new equipment.

So with freshly roasted beans and grinder in hand I set out to make my first espresso on Silvia.  I think I must have wasted half the pound of beans just getting the grind and tamp right, or what I thought was right.  Really, it wasn't right.  I basically just managed to find a grind and tamp that produced a puck that wasn't so tight that it choked Silvia or too loose that water just gushed out.  The first cup of espresso I made that was drinkable really wasn't.  It was horrid.  Sooo bitter and sour.  What had I gotten myself into.?

Baby Beanies Review

Sandy and I picked up this book, Baby Beanies - by Amanda Keeys, at a local grocery store.  We bought it pretty much just because of the cute baby pictures.  I didn't even glance at any of the pattern instructions.  The babies in this book are darn cute; oh yeah and the knitted beanies on them are pretty cute too.

After reading the book and testing out some of the patterns, I have to say that I quite enjoyed the book.  I'm not saying that it's a great read like a good novel but enjoyable for a knitting book.  The patterns are easy to follow and instructions cover the techniques needed to make the beanies.  And of course the cute baby pictures make this book that much more enjoyable.

The book starts out with the usual introduction from the author about how she/he got into knitting and what she/he hoped to give the readers through the book.  Amanda Keeys is actually a professional children's photographer and you can definitely tell from the pictures in her book.  She, like most knitters (I think), got tired of the usual beginner scarf pattern - plain, seemingly never ending garter stitch.  I can so relate to her - I have yet to make another scarf; I made one for Sandy as a Christmas gift and have never made another dull, oh so boring to knit, scarf.  Any way, she actually got into knitting when she just got fed up with boring beginner scarf patterns and just picked up a pair of needles and improvised a baby hat.

I'd say that she fully understands the frustration newbie knitters have with boring beginner patterns like the garter scarf.  Her baby beanie patterns are easy to follow for the beginner and fun to knit.  Also, as she states in her book, baby hats are small so they do not require a great investment in yarn or time.  She does introduce some knitting skills that will test those new to knitting.  If you are a newbie, you'll appreciate the experience - I certainly did; I learned how to do three needle bind-off and a weird thing called knit into front and back of same stitch (kfb).  I also relearned how to increase and decrease - I had forgotten after a long break from knitting (2 year break).

The book is perfect for the beginner knitter who wants to make something other than a scarf.  An added bonus is that, what you end up making looks really pro.

I will add posts with steps and videos of some of the hats I made from this great knitting book.  You can get a copy of the book following this link to Amazon.ca but if you can find it at a local grocery store that has a book aisle, it'll probably be cheaper there since you won't have to pay for shipping.  Unless you were planning on getting other books from Amazon anyway and needed another book to push you into the free shipping range then, maybe Amazon is the way to go.

Sunday, January 18, 2009

Fetching Knitty

Well for my first post, I've decided to go with a knitting post. I found this pattern on a great knitting site - Knitty.com - a place where you can find patterns, submit your patterns, find tips and read articles on knitting. Kind of what I was hoping this site would become one day.

The pattern is called Fetching and it is quite fetching. It is designed by Cheryl Naimath. She actually has submitted quite a few patterns that have made it to the Knitty site. Ah, maybe one day I'll have a pattern posted there.

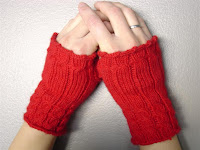
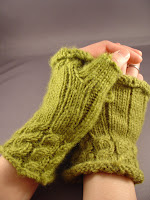
I've made two pairs for Sandy: one set in green (like the pair on the Knitty site), and one in red - I thought it would look good in red but it didn't turn out as the image I had in my mind.


I actually made three pairs. Like all my other knitting projects, the first pair was my test pair - ones where i test out the pattern, figuring out what the pattern is trying to tell me. I had a little trouble with the thumbs. But on the second pair i had figured out the quirks of knitting in the round. I still have problems with the picot edging. I think the problem is keeping track of how many bind offs I've done.

Basically to make a pair of these do the following:

1. Using the cable cast on technique, cast on 45 stitches using double pointed needles.

2. Divide stitches between three double pointed needles - 15 stitches each.

3. Knit 4 rounds using rib pattern which is *4 knit stitches followed by 1 purl stitch, repeat from * until the end of the round.

If the knitting is coming towards you, then the right side is on the outside. If the knitting is going away from you, then the wrong side is on the outside and you should be doing the purl stitch rather than knit stitch). Hopefully the pictures help. This is where I had problems with the thumbs. I was knitting the thumbs according to the instructions but because the knitting was going away from me, the wrong side was on the outside of the round. So, the thumb turned out to be inside out relative to the rest of the piece.

4. Cable round, 4 stitch wide cable) - *put two stitches on to a cable needle, either put it to the back or front depending on if you want the cable to be twisting one way or the other (I never remember which is which), knit the next two and then go back and knit the two stitches on the cable needle. now purl the next stitch. Repeat from * until you reach the end of the round.

5. Knit 5 rib rounds. so 5 rounds using rib pattern - 4 knit stitches, 1 purl stitch and repeat until end of round.

6. Cable round.

7. Knit 5 rib rounds again.

8. Cable round again.

9. Now knit 18 rib rounds.

10. Using scrap yarn, preferably a colour that is very different, knit 7 stitches. Now slide these stitches back onto the left needle. Back to using the regular yarn for the piece, knit 7 stitches again. Knit 2, purl 1, *knit 4, purl 1, repeat from * until the end of the round.

11. Knit 5 rib rounds.

12. Knit cable round.

13. Knit 5 rib rounds.

14. Bind off using picot bind off. To do this, first bind off 5 stitches, then cast on one stitch using cable cast on technique. Slide that new stitch back on to left needle and now bind off 6 stitches. Repeat from * until you get to the last stitch where you do a cable cast on, slide that to the left needle and bind off.

(pictures to come)

15. Knit the thumb. Carefully pull out the scrap yarn and put the loose stitches onto two needles. There should be 6 on top and 7 on the bottom. Using a third needle, pick up 2 stitches on the side of the thumb hole and slide 3 of the 6 stitches on the top needle onto this third needle. Now, using the top needle which now has 3 stitches on it, pick up 2 stitches on the other side of the thumb hole. So now you should have the thumb hole looking like an isosceles triangular hole with 7 stitches on the bottom needle and 5 stitches on either side. See, we do use geometry later in life. Now purl 4 rounds and bind off if the hand warmers is right side out. you can also turn the piece inside out and knit the thumb.

(Pictures to come)

16. Now make another one for the other hand unless you're happy with just one wrist warmer. Or if you're like me, make 5 more to perfect your knittin skills.