Welcome

Hello knitters and coffee addicts and welcome. Even if you're not a knitter or like the taste of coffee - welcome anyway - to the site that promotes the learning and appreciation of knitcraft and coffee. The hope is that you'll leave here keen to knit, charmed to coffee and hankerin to return.

Saturday, January 24, 2009

Sweet Sweet Coffee


Ah, the Chemex brewer - it's a classic.  Designed by Peter J. Schlumbohm back in the 40's, becoming popular in the 70's thanks to it's elegantly simple and pure functional design, the Chemex brewer is back and it's on my kitchen table brewing coffee (wow, that was a really long sentence). 

Yes, the Chemex brewer is back and it's sporting a brand new look.  It's not really that band new of a look.  The Chemex company updated the brewer by replacing the wooden collar and leather strap around the middle with a glass handle.  But other than that, the brewer looks exactly the same as the original.  It still has that glass navel signifying the middle of the brewer from the bottom of the handle down (volumnmetrically speaking).

Just looking at the brewer you can see it's chem lab roots.  Dr. Schlumbohn combined the powers of a glass funnel and an Erlenmeyer flask.  He was probably working late in the lab one night and instead of going to the corner cafe for a double double, the good doctor slapped a funnel on a flask, used some chem lab filter paper and brewed himself a cup of the heavenly black stuff (holy, another really long sentence).  Then he yelled eureka and the rest is history.  The brewer is so significant to American design history that it made it to the permanent collection at the Museum of Modern Art in New York city - probably stored next the the Eames chair.

So to brew coffee in one of these things:

1. You first have to boil some water.

2. Fold the filter paper - get the filters when you by your Chemex brewer.


The filters are just big round filter sheets or big square filter sheets.  Just fold it into quarters.  Better yet, get your filter paper pre-folded.  I got the square papers because the extra paper at the corners makes it really easy to pull out the used filter and grinds to throw away.

3. Put folded filter in brewer.

4. Put coffee grounds in filter - use a regular grind, the kind used for drip coffee.

5. Let boiled water stand for 20-30 seconds.

You don't want boiling water to hit your coffee grounds; the water should be just a bit below boiling.

6. Pour a little bit of the hot water slowly onto the grounds and watch the ground bloom.

Basically, you want the water to wet all the grounds so that they'll swell and fill all the air gaps in between the coffee grounds.  This is to slow the hot water's movement through the grounds so that it can absorb more of the coffee goodness.

7. Now you can pour more water into the funnel opening of the Chemex brewer.

8. VERY IMPORTANT - Drink and enjoy your brewed coffee.

Drink your coffee soon after you've made a pot.  It cools fast; I blame the flat bottom.  To help it stay warm longer, I usually leave the used filter and grounds on the brewer after I've finished brewing.  I just lift the filter paper by the corners to pour myself a cup.  I don't know if it helps but in my mind, the filter and grounds act as a plug keeping in the heat.

9. Throw away filter and grounds and clean brewer.  Soap and water is fine.  The hard part is drying it.  I'd use one of those flask drying stands that you see at kitchen or wine shops or lay out a kitchen towel and place the Chemex on that upside down.

The coffee is similar to drip coffee but cleaner.  The Chemex filter paper is a thicker filters than the ones used in drip coffee so most if not all of the coffee grounds are filtered out of the coffee.  The paper also aborbs most of the oils.  I don't see the oily film on top of the cup like I would with coffee brewed using the french press.  This might be a bad thing for some because the flavors and the richness of coffee are in the oils.  But I see this as just a different way to enjoy coffee.  To me, the coffee is clean and crisp.

If you want a Chemex, you can get one directly from Chemex.  If you are from Canada, call the company and ask if they can send it by United Postal and not UPS in order to avoid the brokerage charges.  The nice lady on the phone at Chemex did that for me.  Sweet Maria's also sell the Chemex brewer but they don't ship brewers to Canada for some reason.  I find this odd because they're able to ship espresso makers and grinders to Canada.  If you're really lucky, you might be able to find one of the classic brewers in a thrift store.  My sister has one of these.  I never really like the wooden collar but Sandy thinks it's what makes the brewer cool.  I like the glass handle.

Friday, January 23, 2009

1st Coffee Post - How I got into coffee


Well, seeing how this blog is called Knit, Purl and Brew I figure I should try to stay true to the title and have a few posts on coffee.  Yes, the Brew refers to brewing coffee.  Although, I had thought about opening it up to include tea and maybe even beer.  Let's just say that I'm not totally closing the door on beer - I'll probably throw a post or two about it.  Maybe I'll try knitting drunk one day.

Anyhoo, back to coffee.  Yup, I'm into coffee... alot of coffee.  I drink quite a bit of coffee at work everyday - most of it not very good coffee.  But on the weekends, that's when I break out the good stuff.  Nothing beats a freshly ground and brewed cup-o-joe on a cold Edmonton Sunday morning.

I got into coffee thanks to my mom.  I don't remember where we were, but I was quite young, maybe 7 or 8, it was cold and my mom gave me a sip of her coffee to warm me up.  Back then she had cream and sugar with her coffee.  When I tasted that warm sweet creamy liquid I was hooked.

Even though enjoyed the taste of coffee, I actually didn't drink much coffee after that first experience, but when I grew up, I re-established my addition.  Throughout university, coffee kept me awake and focused when studying.  Then I discovered coffeegeek - a website dedicated to coffee and espresso.  Soon, I learned that there was quite the coffee community online.  Even though I was in cold blue collar Edmonton, I could get all the coffee information I needed.  The only thing left was to taste great espresso.

With coffeegeeks reviews and forums, I decided to get Silvia, a tough little starter espresso machine that was very finicky with her temperature consistency.  But from the interweb I discovered that she could be modded.  Sites like Murphy's  and Pepe's (I can't seem to find his site), detail how a PID can be implanted into Silvia to make her great.Then on one fateful day in September she was mine.  Sandy and I had been dating for about a year and she surprised me with Silvia for my birthday gift.  

Of course any coffeegeek would know that you need a good grinder to get good espresso.  I had wanted to get the Mazzer Mini, the ultimate in home coffee grinders at the time.  But also at the time, I was short on free money so I looked around the netterweb and found Sweet Maria's.  
They carried hand grinders from Zassenhaus which had conical burrs - which is the latest thing in grinders now(conical burrs, not hand grinders, back then the flat burrs were the norm).  Plus, I figured, since the coffee was hand ground, physically, I would not be able to heat up the grounds through grinding - this was a good thing.  So ordered one from Sweet Maria's.

With the grinder on it's way, I needed some beans, freshly roasted beans.  These I found locally.  Even though, at the time, Edmonton only had one or two espresso cafes it had a roaster - Edmonton Tea and Coffee and they carried 100% Kona and Jamaican Blue Mountain beans as well as other coffees and blends.  But being me, with the mentality of going big or go home, I got a pound of kona beans.  Not really the best purchase for the newb barista on a new equipment.

So with freshly roasted beans and grinder in hand I set out to make my first espresso on Silvia.  I think I must have wasted half the pound of beans just getting the grind and tamp right, or what I thought was right.  Really, it wasn't right.  I basically just managed to find a grind and tamp that produced a puck that wasn't so tight that it choked Silvia or too loose that water just gushed out.  The first cup of espresso I made that was drinkable really wasn't.  It was horrid.  Sooo bitter and sour.  What had I gotten myself into.?

Baby Beanies Review

Sandy and I picked up this book, Baby Beanies - by Amanda Keeys, at a local grocery store.  We bought it pretty much just because of the cute baby pictures.  I didn't even glance at any of the pattern instructions.  The babies in this book are darn cute; oh yeah and the knitted beanies on them are pretty cute too.

After reading the book and testing out some of the patterns, I have to say that I quite enjoyed the book.  I'm not saying that it's a great read like a good novel but enjoyable for a knitting book.  The patterns are easy to follow and instructions cover the techniques needed to make the beanies.  And of course the cute baby pictures make this book that much more enjoyable.

The book starts out with the usual introduction from the author about how she/he got into knitting and what she/he hoped to give the readers through the book.  Amanda Keeys is actually a professional children's photographer and you can definitely tell from the pictures in her book.  She, like most knitters (I think), got tired of the usual beginner scarf pattern - plain, seemingly never ending garter stitch.  I can so relate to her - I have yet to make another scarf; I made one for Sandy as a Christmas gift and have never made another dull, oh so boring to knit, scarf.  Any way, she actually got into knitting when she just got fed up with boring beginner scarf patterns and just picked up a pair of needles and improvised a baby hat.

I'd say that she fully understands the frustration newbie knitters have with boring beginner patterns like the garter scarf.  Her baby beanie patterns are easy to follow for the beginner and fun to knit.  Also, as she states in her book, baby hats are small so they do not require a great investment in yarn or time.  She does introduce some knitting skills that will test those new to knitting.  If you are a newbie, you'll appreciate the experience - I certainly did; I learned how to do three needle bind-off and a weird thing called knit into front and back of same stitch (kfb).  I also relearned how to increase and decrease - I had forgotten after a long break from knitting (2 year break).

The book is perfect for the beginner knitter who wants to make something other than a scarf.  An added bonus is that, what you end up making looks really pro.

I will add posts with steps and videos of some of the hats I made from this great knitting book.  You can get a copy of the book following this link to Amazon.ca but if you can find it at a local grocery store that has a book aisle, it'll probably be cheaper there since you won't have to pay for shipping.  Unless you were planning on getting other books from Amazon anyway and needed another book to push you into the free shipping range then, maybe Amazon is the way to go.

Sunday, January 18, 2009

Fetching Knitty

Well for my first post, I've decided to go with a knitting post. I found this pattern on a great knitting site - Knitty.com - a place where you can find patterns, submit your patterns, find tips and read articles on knitting. Kind of what I was hoping this site would become one day.
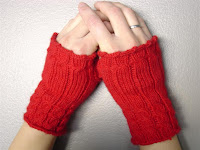
The pattern is called Fetching and it is quite fetching. It is designed by Cheryl Naimath. She actually has submitted quite a few patterns that have made it to the Knitty site. Ah, maybe one day I'll have a pattern posted there.

I've made two pairs for Sandy: one set in green (like the pair on the Knitty site), and one in red - I thought it would look good in red but it didn't turn out as the image I had in my mind.


I actually made three pairs. Like all my other knitting projects, the first pair was my test pair - ones where i test out the pattern, figuring out what the pattern is trying to tell me. I had a little trouble with the thumbs. But on the second pair i had figured out the quirks of knitting in the round. I still have problems with the picot edging. I think the problem is keeping track of how many bind offs I've done.

Basically to make a pair of these do the following:

1. Using the cable cast on technique, cast on 45 stitches using double pointed needles.

2. Divide stitches between three double pointed needles - 15 stitches each.

3. Knit 4 rounds using rib pattern which is *4 knit stitches followed by 1 purl stitch, repeat from * until the end of the round.

If the knitting is coming towards you, then the right side is on the outside. If the knitting is going away from you, then the wrong side is on the outside and you should be doing the purl stitch rather than knit stitch). Hopefully the pictures help. This is where I had problems with the thumbs. I was knitting the thumbs according to the instructions but because the knitting was going away from me, the wrong side was on the outside of the round. So, the thumb turned out to be inside out relative to the rest of the piece.

4. Cable round, 4 stitch wide cable) - *put two stitches on to a cable needle, either put it to the back or front depending on if you want the cable to be twisting one way or the other (I never remember which is which), knit the next two and then go back and knit the two stitches on the cable needle. now purl the next stitch. Repeat from * until you reach the end of the round.

5. Knit 5 rib rounds. so 5 rounds using rib pattern - 4 knit stitches, 1 purl stitch and repeat until end of round.

6. Cable round.

7. Knit 5 rib rounds again.

8. Cable round again.

9. Now knit 18 rib rounds.

10. Using scrap yarn, preferably a colour that is very different, knit 7 stitches. Now slide these stitches back onto the left needle. Back to using the regular yarn for the piece, knit 7 stitches again. Knit 2, purl 1, *knit 4, purl 1, repeat from * until the end of the round.

11. Knit 5 rib rounds.

12. Knit cable round.

13. Knit 5 rib rounds.

14. Bind off using picot bind off. To do this, first bind off 5 stitches, then cast on one stitch using cable cast on technique. Slide that new stitch back on to left needle and now bind off 6 stitches. Repeat from * until you get to the last stitch where you do a cable cast on, slide that to the left needle and bind off.

(pictures to come)

15. Knit the thumb. Carefully pull out the scrap yarn and put the loose stitches onto two needles. There should be 6 on top and 7 on the bottom. Using a third needle, pick up 2 stitches on the side of the thumb hole and slide 3 of the 6 stitches on the top needle onto this third needle. Now, using the top needle which now has 3 stitches on it, pick up 2 stitches on the other side of the thumb hole. So now you should have the thumb hole looking like an isosceles triangular hole with 7 stitches on the bottom needle and 5 stitches on either side. See, we do use geometry later in life. Now purl 4 rounds and bind off if the hand warmers is right side out. you can also turn the piece inside out and knit the thumb.

(Pictures to come)

16. Now make another one for the other hand unless you're happy with just one wrist warmer. Or if you're like me, make 5 more to perfect your knittin skills.