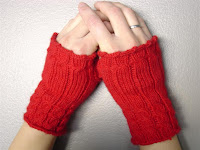
 Well for my first post, I've decided to go with a knitting post. I found this pattern on a great knitting site - Knitty.com - a place where you can find patterns, submit your patterns, find tips and read articles on knitting. Kind of what I was hoping this site would become one day.
The pattern is called Fetching and it is quite fetching. It is designed by Cheryl Naimath. She actually has submitted quite a few patterns that have made it to the Knitty site. Ah, maybe one day I'll have a pattern posted there.
I've made two pairs for Sandy: one set in green (like the pair on the Knitty site), and one in red - I thought it would look good in red but it didn't turn out as the image I had in my mind.


I actually made three pairs. Like all my other knitting projects, the first pair was my test pair - ones where i test out the pattern, figuring out what the pattern is trying to tell me. I had a little trouble with the thumbs. But on the second pair i had figured out the quirks of knitting in the round. I still have problems with the picot edging. I think the problem is keeping track of how many bind offs I've done.
Basically to make a pair of these do the following:
1. Using the cable cast on technique, cast on 45 stitches using double pointed needles.
2. Divide stitches between three double pointed needles - 15 stitches each.
3. Knit 4 rounds using rib pattern which is *4 knit stitches followed by 1 purl stitch, repeat from * until the end of the round.
If the knitting is coming towards you, then the right side is on the outside. If the knitting is going away from you, then the wrong side is on the outside and you should be doing the purl stitch rather than knit stitch). Hopefully the pictures help. This is where I had problems with the thumbs. I was knitting the thumbs according to the instructions but because the knitting was going away from me, the wrong side was on the outside of the round. So, the thumb turned out to be inside out relative to the rest of the piece.
4. Cable round, 4 stitch wide cable) - *put two stitches on to a cable needle, either put it to the back or front depending on if you want the cable to be twisting one way or the other (I never remember which is which), knit the next two and then go back and knit the two stitches on the cable needle. now purl the next stitch. Repeat from * until you reach the end of the round.
5. Knit 5 rib rounds. so 5 rounds using rib pattern - 4 knit stitches, 1 purl stitch and repeat until end of round.
6. Cable round.
7. Knit 5 rib rounds again.
8. Cable round again.
9. Now knit 18 rib rounds.
10. Using scrap yarn, preferably a colour that is very different, knit 7 stitches. Now slide these stitches back onto the left needle. Back to using the regular yarn for the piece, knit 7 stitches again. Knit 2, purl 1, *knit 4, purl 1, repeat from * until the end of the round.
11. Knit 5 rib rounds.
12. Knit cable round.
13. Knit 5 rib rounds.
14. Bind off using picot bind off. To do this, first bind off 5 stitches, then cast on one stitch using cable cast on technique. Slide that new stitch back on to left needle and now bind off 6 stitches. Repeat from * until you get to the last stitch where you do a cable cast on, slide that to the left needle and bind off.
(pictures to come)
15. Knit the thumb. Carefully pull out the scrap yarn and put the loose stitches onto two needles. There should be 6 on top and 7 on the bottom. Using a third needle, pick up 2 stitches on the side of the thumb hole and slide 3 of the 6 stitches on the top needle onto this third needle. Now, using the top needle which now has 3 stitches on it, pick up 2 stitches on the other side of the thumb hole. So now you should have the thumb hole looking like an isosceles triangular hole with 7 stitches on the bottom needle and 5 stitches on either side. See, we do use geometry later in life. Now purl 4 rounds and bind off if the hand warmers is right side out. you can also turn the piece inside out and knit the thumb.
(Pictures to come)
16. Now make another one for the other hand unless you're happy with just one wrist warmer. Or if you're like me, make 5 more to perfect your knittin skills.